That is why we came up with this article to show you how to stream on Twitch from PC, Mac, Xbox, and PS4. So just sit tight, and take your first step to become a streamer on Twitch. Here are the quick links to the desired section in the article for easy and quick navigation.
Stream On Twitch With Mac, PC Twitch Stream From Windows PC Stream To Twitch Using PS4 Live Stream On Twitch With Xbox
Software To Stream On Twitch With Mac, Windows PC
If you want to stream yourself playing games or maybe doing something else on PC/Mac, then you’ll have to use any one of the following software.
1 Software To Stream On Twitch With Mac, Windows PC2 Stream On Twitch Using OBS2.1 Getting The Stream Key On Twitch2.2 Enter Twitch Stream Key In OBS Studio3 Stream Settings On Twitch3.1 Sources3.2 Scenes3.3 Setup Scenes And Sources In OBS3.4 Audio Settings3.5 Start Streaming On Twitch4 Stream On Twitch Using XSplit [Only For Windows]4.1 Setup Scenes And Sources In XSplit4.2 Audio Settings In XSplit4.3 Start Streaming On XSplit5 Stream On Twitch On PS46 Stream On Twitch On Xbox One6.1 Wrapping Up
- OBS(Open Broadcasting Software) studio: OBS Studio is a free open source software while enables you to live stream and record your favorite moments. This software is completely free to use, so you won’t have to pay a dime to use any of its features. However, setting up your live streaming using this software is not that easy.
- XSplit: XSplit is another broadcaster and is a great alternative to OBS Studio. The interface of this software is much easier and unlike OBS, XSplit has a short setup process to start live streaming. However, this software is not completely free like OBS, so you’ll have to pay to get some advanced features.
Stream On Twitch Using OBS
Getting The Stream Key On Twitch
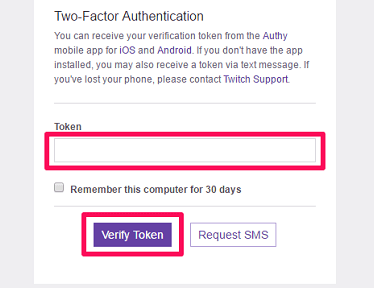
The very first thing that you need to do is get the stream key on Twitch. And for that, first, you’ll have to enable the two-factor authentication on Twitch if you haven’t already. Once the two-step verification is done, you can get your streaming key by following the steps below.
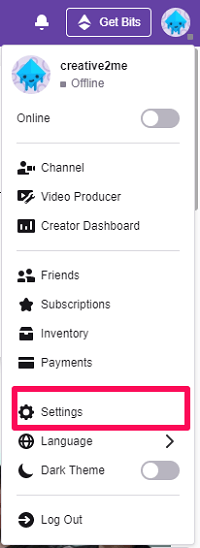
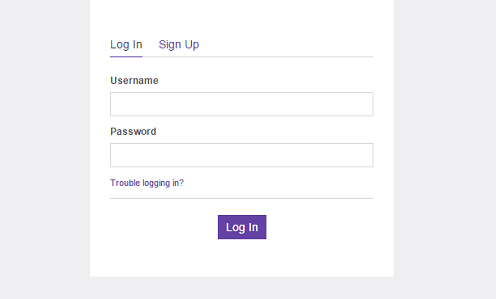
Log in to your Twitch account and click on your Twitch avatar on the top right corner of the screen.
Next, click on Settings.
Now that you’re on settings, go to the Channel and Videos tab. 4. After that, you’ll see your Primary Stream key at the very top, just copy it.
Enter Twitch Stream Key In OBS Studio
After getting the stream key from Twitch, you have to enter that key in OBS studio. Just follow the given steps to get it done.
Download and install OBS Studio on your PC if you don’t have it already.
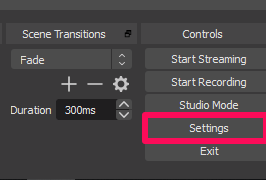
Now, launch OBS and click on the Settings option, which can be seen along with other options on the bottom right corner of the screen.
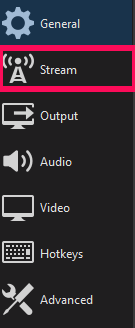
Click on the Stream tab which is just below the General tab on the top left corner of the OBS screen.
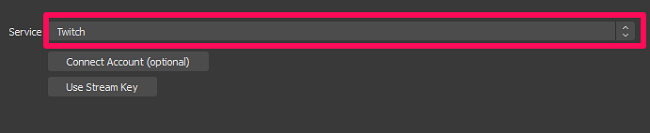
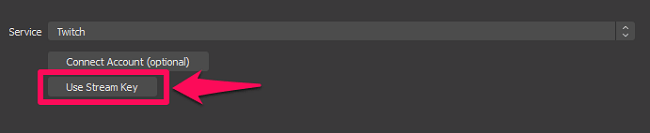
Now, in the stream settings, select Twitch as the service. You can also connect your Twitch account by putting in your Twitch login details, but that is optional.
Finally, click on the Use Stream Key option.
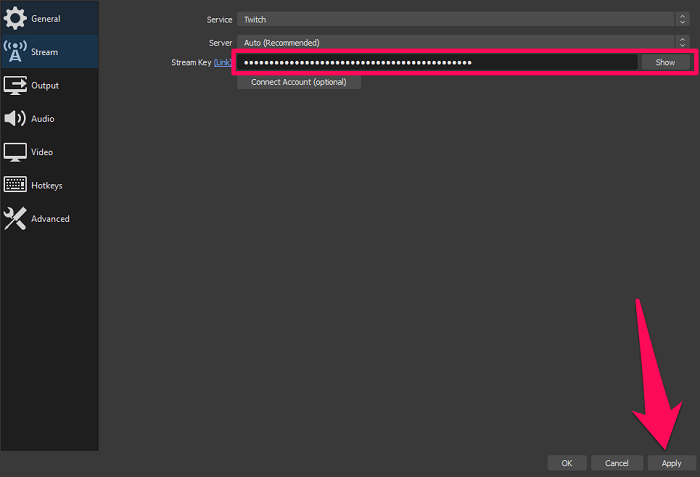
As soon as you click on that, you’ll be asked to input your stream key. Just paste the key in the input box and click on Apply to save the changes you’ve just made.
That’s it. You are now ready to start your streaming on Twitch.
Stream Settings On Twitch
Well, as you are now done with the most hectic part of the process, it’s the right time to start your first stream on Twitch. And to do that, first, you need to know about the two most important things on Twitch.
Sources
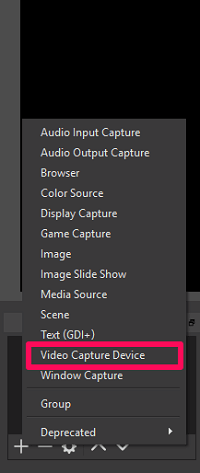
On OBS, you have to provide sources from which the stream should be picked up. Like if you want to use your webcam, then you’ll have to provide the source ‘Video Capture Device.’ And similarly, if you want to stream a particular window, then the required source will be ‘Window Capture.’
Scenes
Scenes are basically a collection of different sources. You can create different scenes to create different types of streaming formats. Like you can create a scene named ‘Game,’ and you can add sources like ‘Video Capture Device’ and ‘Game Capture’ in that source.
Setup Scenes And Sources In OBS
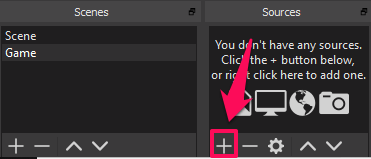
So to create a scene, you just have to click on the ‘+’ icon in the Scene tab. After that, provide a name for your new scene and then click on OK.
After you’re done creating a new scene, click on the ‘+’ icon in the Sources tab to add the sources to the scene. Now, just select the source which you want to add in the scene and provide a unique name to it. You can also add the already existing sources to your new scene by clicking on the ‘Add existing’ option and then selecting the source.
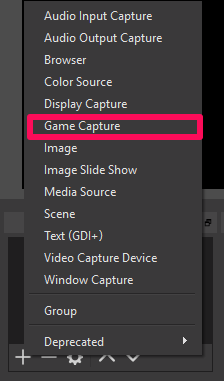
To stream gameplay, first, you have to launch your game in the background. Next, go back to the OBS and add the ‘Game Capture’ source to the scene.
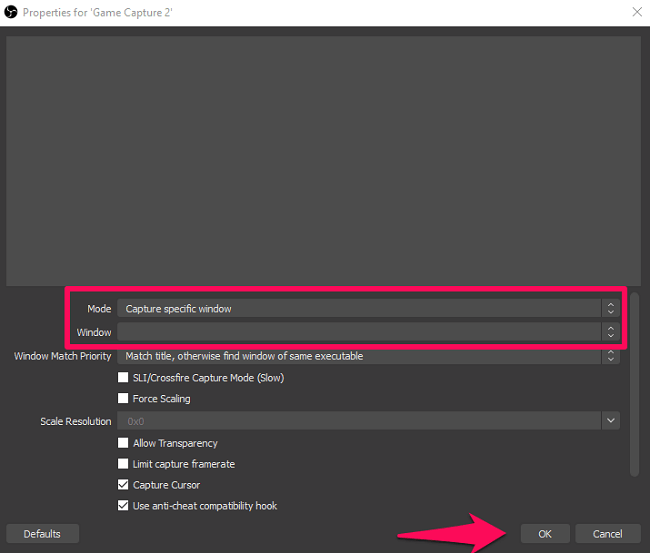
And in the settings of that source, you have to select the ‘Capture specific Window’ as the Mode. After that, just select your game window as the desired window and click on OK to apply the changes you’ve just made.
You can also add ‘Video Capture Device’ source in that same scene if you want to show yourself while streaming the game. In that case, you can adjust the size of two sources in the stream to make them fit together.
Audio Settings
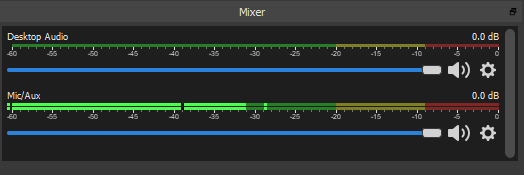
After you have created scenes and added sources to it, the final thing you have to do before starting the stream is getting your audio settings right. Basically, there are two types of audio settings, the first is Desktop audio and the second is Mic/Aux audio.
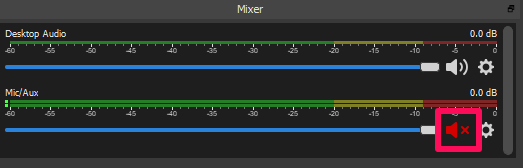
Desktop audio will capture the sound of the window that is being streamed. Like if you are streaming ‘Fortnite,’ then it will also stream the sound of the game if the Desktop audio is turned on. On the other hand, Mic/Aux audio will capture the sound of your surroundings. This should be turned ON if you’re using a Microphone and you want the viewers to listen to everything you are speaking. But if you don’t want to use it, then you can turn it off by clicking on the speaker icon for the Mic/aux. If the icon is red, then it means the viewers can’t listen to you.
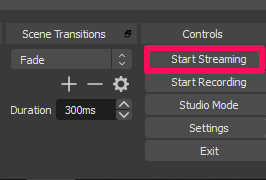
Start Streaming On Twitch
So, as now you’ve completed the setup process for the stream, it’s time that you start streaming. To get it started, just click on the ‘Start Streaming’ option and instantly, you’ll go live on Twitch.
To stop the streaming, you just have to click on the ‘Stop Streaming’ option. This option will automatically replace the Start Streaming option while streaming. And that’s it. You’ve just done your first live stream on Twitch. The process is very long when setting it up for the first time. But it’ll only take a few minutes to start streaming once you’re done with the setup process.
Stream On Twitch Using XSplit [Only For Windows]
XSplit is another tool that allows you to live stream on platforms like YouTube, Facebook, and Twitch. The setup process to connect your XSplit account with your Twitch account isn’t that hectic, so this software does stand out in that regard. However, this software isn’t completely free to use. You’ll have to pay some bucks to get some extra benefits. Like you’ll have to buy a license to broadcast in 1080p resolution without watermark. But still, if you want to use this software instead of OBS studio, then you can follow the steps given below to get started with XSplit.
First, download and install the XSplit Desktop app on your PC.
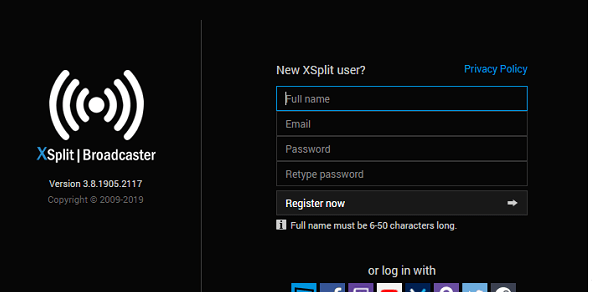
Launch the app and create your XSplit account by providing the required details.
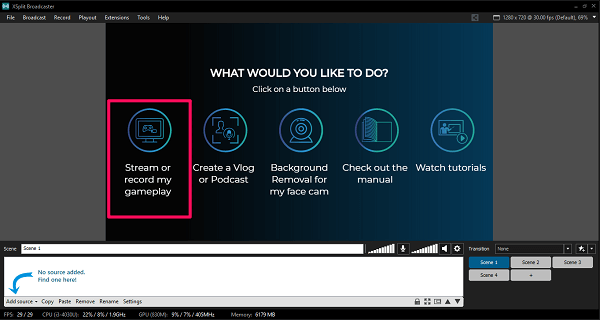
After that, you’ll be presented with a bunch of options, just click on ‘Stream or Record my gameplay’ option.
Now that you’re on the main screen, click on the Broadcast option on the top left corner of the screen. And then expand the ‘Set up a new output’ option and select Twitch.
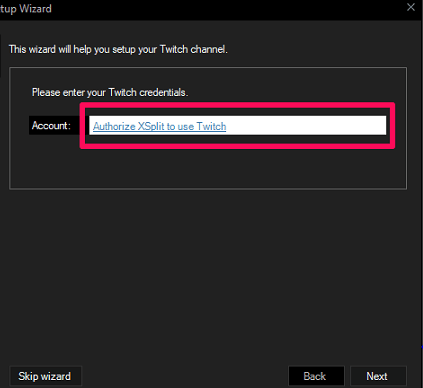
To be able to enter your Twitch credentials, click on ‘Authorize XSplit to use Twitch’ option.
Now, you have to enter your Twitch login details to connect your account with XSplit.
You’ll get a verification Code/Token on your registered mobile number with Twitch. Just enter the code and then click on ‘Verify Token.’
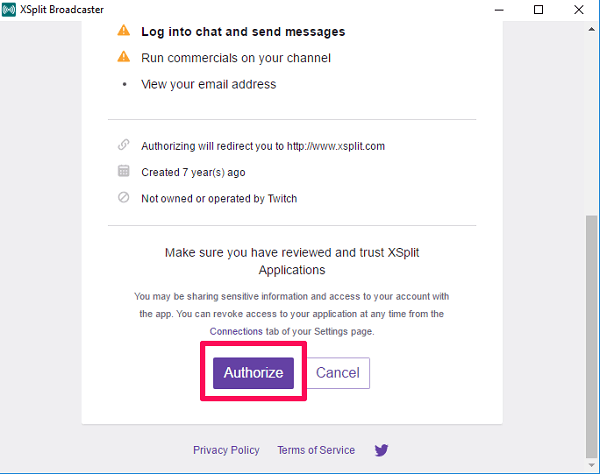
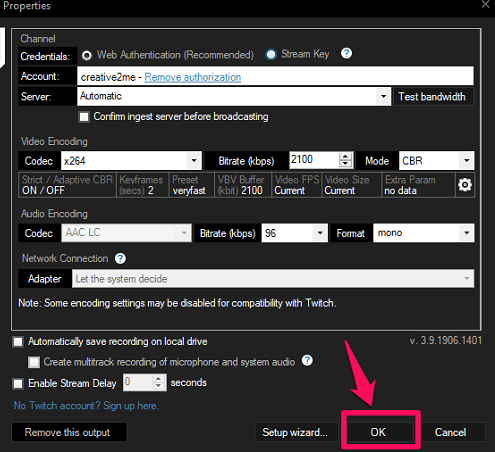
After that, give XSplit permission to access your Twitch account by clicking on Authorize.
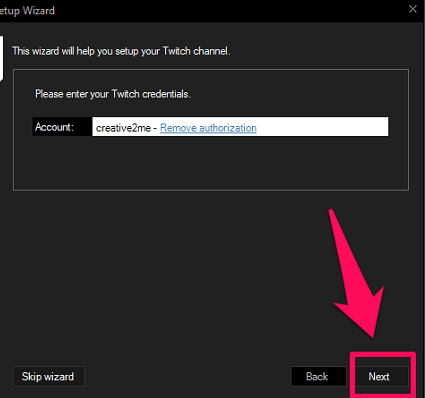
You’ll now get back to the channel setup wizard, click on Next to move forward.
Now the setup process will start, wait for it to complete.
After the setup is completed, select your desired resolution and click on Finish.
Review your Twitch properties and if you’re satisfied with everything, click on OK.
Setup Scenes And Sources In XSplit
The process to set up Scenes and Sources are exactly similar in both XSplit and OBS studio. But still, we have mentioned the steps for the same in case you get confused with the setup.
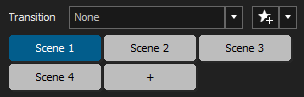
First, select a scene from the four by default created scenes on the bottom right corner of the screen.
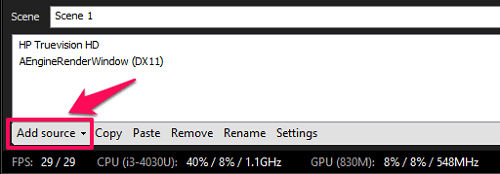
After that, add sources to the scene by clicking on the Add source option on the bottom left corner of the screen.
Note: If you want to stream gameplay, then the game should be running in the background.
Audio Settings In XSplit
Similarly like OBS, XSplit also has Desktop and Microphone audio options. So you can stream while letting your viewers listen to the desktop audio, and you can also attach a microphone to interact with the viewers through your voice. To disable either of the audio while streaming, just click on their respective icon and a line will come over the icon showing that the audio has been disabled.
Start Streaming On XSplit
After you’re done setting up the scene and sources, you can start your broadcast by clicking on the Broadcast icon in the toolbar and then selecting the Twitch Output. Now, just select the 720p video resolution if you don’t want to pay for the license for higher resolutions. To stop the broadcast, you again have to click on the Broadcast option in the toolbar and uncheck the Twitch Output.
Stream On Twitch On PS4
Streaming on Twitch through PS4 is really easy when compared to streaming on PC/Mac. You don’t need any additional software as the PS4 has a built-in streaming function. Connecting your PS4 with your Twitch account is also really easy. Just follow these simple steps to do so.
- To start streaming, you just need to press the SHARE button on the PlayStation controller.
- Then, you’ll have to select the Broadcast Gameplay option followed by the Twitch option.
- Now, to sign in, PS4 will display a code and you’ll have to enter that code on Twitch activate page.
- After this, the process to link your PS4 with your Twitch account will be complete.
- You now have to press the share button again and select Twitch to start streaming. Before starting streaming, you might have to do additional settings, like checking the audio option if you want audio in your stream. And you can also check the webcam option if you have a camera attached to your PlayStation and you want to stream yourself while playing the game. If you want to learn about streaming from PS4 in more detail, then you can read the complete guide on Twitch Stream from PS4 by Lifewire.
Stream On Twitch On Xbox One
Streaming on Xbox One is not that easy as PS4, but it’s also isn’t that hard. The main difference is that the Xbox One doesn’t have the pre-installed Twitch app, but the app is not that hard to get. Follow the process mentioned below to start streaming through your Xbox.
- Download and install the Twitch app on your Xbox by finding it on the Xbox store.
- Now, launch the app and select sign in. You’ll be presented with a unique code that you need to enter in the Twitch activation page.
- After having your Twitch account linked, launch the game which you want to stream.
- Now, if you own a Kinect, then you just have to give the command “Cortana, Broadcast” or “Cortana, open Twitch” to launch the Twitch app. And if you can’t give voice commands, then just tap the Home button twice and then navigate to Snap Menu > Twitch.
- After the Twitch is running, you can go live by selecting the Broadcast option. Before going live on Twitch, it’s better to adjust other settings like audio or resolution. And you can very easily find the settings for the stream, but if you need some help, then you can read the Live streaming to Twitch from Xbox One guide by Tom’s Guide. Also on TechUntold: How To Change Twitch Name And Color
Wrapping Up
So if you’re someone who didn’t know anything about streaming on Twitch from whatsoever platform, then after reading this article, you might have learned a great deal about it. Streaming on Twitch from PC/Mac is not that easy, but you can follow the step by step guide to get it done without any problems. And if you still face any problem while streaming, then don’t hesitate to ask us about that in the comments. We would be happy to answer each and every one of your queries. Save my name, email, and website in this browser for the next time I comment. Notify me of follow-up comments via e-mail.
Δ