Now the main problem is Skypehost.exe shows high CPU and memory usage in Task Manager. Even if you end its process or disable it, you will again find it running in the background. If you run Skype as a Windows 10 app, it will take a lot of your system resources probably causing high CPU usage, but if you download the desktop version of Skype, you will have no such issues. So to fix this issue the issue you need to first completely uninstall Skype app for Windows 10 then install the desktop version. So without wasting any time le’s see How to Disable Skypehost.exe on Windows 10 with the help of the below-listed guide.
How to Disable Skypehost.exe on Windows 10
Make sure to create a restore point just in case something goes wrong.
How to Disable Skypehost.exe on Windows 10 Method 1: Remove Skype from Apps and Features Method 2: Remove Skype Via Powershell
Method 1: Remove Skype from Apps and Features
Press Windows Key + I to open Settings then click on Apps.
From the left-hand menu, select Apps & features.
Now, under Apps & features, heading type skype in the Search box.
Click on Messaging + Skype, and then click Uninstall.
Similarly, click on Skype (which is smaller in size) and click Uninstall.
Reboot your PC to save changes.
Method 2: Remove Skype Via Powershell
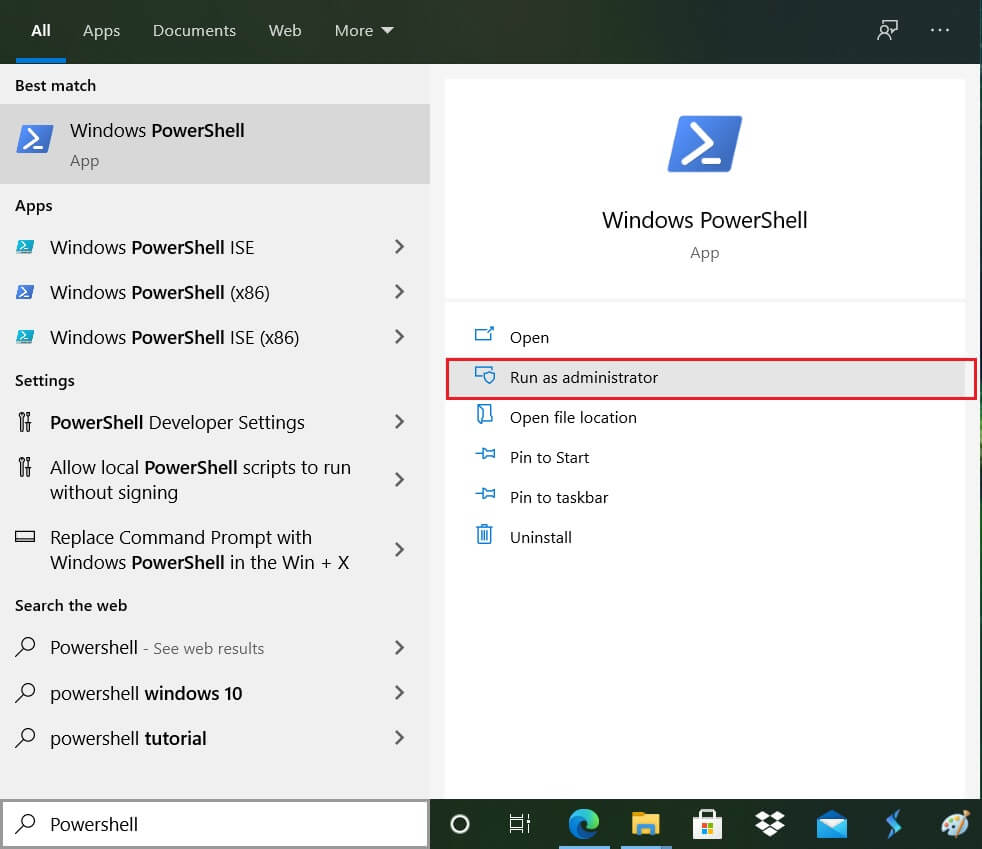
Press Windows Key + Q to bring up Search, type PowerShell and right-click on PowerShell and select Run as Administrator.
Type the following command into PowerShell and hit Enter after each one: Get-AppxPackage messaging | Remove-AppxPackage Get-AppxPackage skypeapp | Remove-AppxPackage
Wait for the command to finish processing and see if you’re able to Disable Skypehost.exe on Windows 10.
If you still suck, then again open PowerShell.
Type the following command and hit Enter: Get-AppxPackage | Select Name, PackageFullName
Now, it will display all the installed apps on your Windows, search for Microsoft.SkypeApp.
Note down the PackageFullName of Microsoft.SkypeApp.
Type the following command into PowerShell and hit Enter: Get-AppxPackage PackageFullName | Remove-AppxPackage
Note: Replace PackageFullName with the actual value of Microsoft.SkypeApp. 9. This will successfully remove Skype from your system. Recommended:
Fix Entry Point Not Found Error in Windows 10 Fix YouTube Green Screen Video Playback How to Zoom out on Computer Screen Fix Windows 10 install Fails With Error C1900101-4000D
That’s it you have successfully Disable Skypehost.exe on Windows 10 but if you still have any questions regarding this post then feel free to ask them in the comment’s section.