Tethering is also available for Wi-Fi and Bluetooth, they are called Wi-Fi tethering & Bluetooth tethering. But make sure you understand that tethering is not free of cost, and if you don’t have any data plan on your mobile then you will need to pay for the data consumed by you while in the tether mode. Anyway, without wasting any time let’s see How to Fix USB Tethering Not Working in Windows 10 with the help of the below-listed guide.
How to Use USB Tethering in Windows 10
1.Connect your phone using the USB cable to your PC.
How to Use USB Tethering in Windows 10 Fix USB Tethering Not Working in Windows 10 Method 1: Fix USB Tethering Not Working in Windows 10 through Device Manager Method 2: Run the Hardware and Devices troubleshooter Method 3: Registry Fix
2.Now from your phone, open Settings then tap on More under Network. Note: You may find the Tethering option under Mobile Data or Personal Hotspot section. 3.Under More tap on “Tethering & Mobile Hotspot“.
4.Tap or check USB Tethering option.
Fix USB Tethering Not Working in Windows 10
Make sure to create a restore point just in case something goes wrong.
Method 1: Fix USB Tethering Not Working in Windows 10 through Device Manager
1.Press Windows Key + R then type devmgmt.msc and hit Enter to open Device Manager.
2.Expand Network adapters then right-click “Remote NDIS based Internet Sharing Device” and select Update Driver.
3.On the next window, click on “Browse my computer for driver software“.
4.Click on “Let me pick from a list of available drivers on my computer“.
5.Uncheck “Show compatible hardware” then under Manufacturer select Microsoft. 6.Under right window pane select USB RNDIS6 Adapter and click Next.
7.Click Yes to confirm your actions and continue.
8.Wait for few seconds and Microsoft will successfully install the network adapter drivers.
See if you’re able to Fix USB Tethering Not Working in Windows 10, if not then continue with the next method.
Method 2: Run the Hardware and Devices troubleshooter
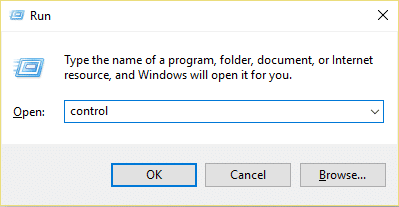
1.Press the Windows key + R then type control and hit Enter.
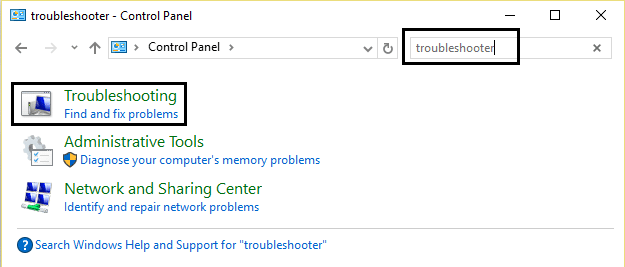
2.Search Troubleshoot and click on Troubleshooting.
3.After that click on Configure a device link under Hardware and Sound and follow on-screen instruction.
4.This will successfully run the troubleshooter, if any problems are found then troubleshooter will try to repair them automatically.
Method 3: Registry Fix
1.Press Windows Key + X then select Command Prompt (Admin).
2.Type the following command into cmd and hit Enter: sc.exe config netsetupsvc start=disabled
3.Press Windows Key + R then type devmgmt.msc and hit Enter to open Device Manager.
4.Right-click on “[Your Device Name] Remote NDIS based Internet Sharing Device” and select Uninstall device.
5.Click Yes to continue with the uninstallation. 6.Now click on Action from Device Manager Menu and then click on “Scan for hardware changes“.
7.Windows will automatically install the drivers for your device and you will again see your device under network adapters. 8.Press Windows Key + R then type regedit and hit Enter to open Registry Editor.
9.Navigate to the following registry key: 10.Expand the above registry key then find the registry key with an entry with value “Remote NDIS based Internet Sharing Device” as DriverDesc.
11.Now right-click on the above registry key and select New > DWORD (32-bit) value. 12.Follow the above step 3 times to create 3 DWORD’s and name them as: *IfType *MediaType *PhysicalMediaType
13.Make sure to set the value of the above DWORD’s as following: *IfType = 6 *MediaType = 0 *PhysicalMediaType = 0xe 14.Again open Command Prompt (Admin) and type the following command into cmd and hit Enter: sc.exe config netsetupsvc start=demand
15.From Device Manager, right-click on your device under Network Adapters then select Disable. 16.Again right-click on it and select Enable and this should Fix USB Tethering Not Working in Windows 10. Recommended:
Windows Update Stuck at 0% [SOLVED] SOLVED: Your PC ran into a problem and needs to restart Stop Windows 10 Update Completely [GUIDE] Enable Adobe Flash Player on Chrome, Firefox, and Edge
That’s it you have successfully Fix USB Tethering Not Working in Windows 10 but if you still have any queries regarding this tutorial then feel free to ask them in the comment’s section.